Overview
We will undertake the architectural design of an IoT solution
through system analysis, integration, programming, and prototyping
using industry standard protocols and tools. We will
build upon the following components and technologies in the course of
developing an end-to-end IoT solution.
IoT Definition
So what is the Internet of Things (IoT)?
One definition might be that IoT encompasses any sensor that can
be controlled and is connected to the internet.
Another IoT Definition: http://www.mckinsey.com/industries/high-tech/our-insights/the-internet-of-things
"In what's
called the Internet of Things, sensors and actuators embedded in
physical objects, from roadways to pacemakers, are linked through
wired and wireless networks, often using the same Internet Protocol
(IP) that connects the Internet."
So you can think of it as: a combination of a physical object + a controller/sensor/actuator + the Internet
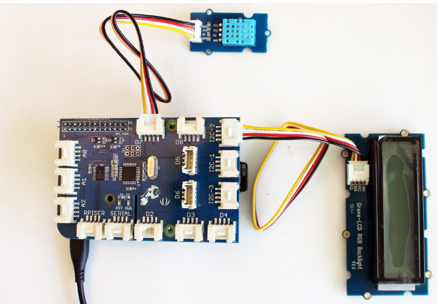
Hardware/Sensors/Actuators
Most of the hardware in the course, other than the raspberry pi
itself (like the Vilros Kit), is from
Dexter Industries,
which makes Grove Sensor Modules for the Raspberry Pi like the ones listed below
that use the GrovePi+ Starter Kit:
- Raspberry Pi 3+
- GrovePi Board
- GrovePi Sensor Module – RGB Backlit LCD
- GrovePi Sensor Module – LED (Green and Red)
- GrovePi Sensor Module – Relay
- GrovePi Sensor Module – Moisture Sensor
- GrovePi Sensor Module – Air Quality Sensor v1.3
- GrovePi Sensor Module – Dust Sensor
- GrovePi Sensor Module – Temperature Humidity Sensor
- GrovePi Sensor Module – Buzzer
Software
Python for writing scripts for the hardware control and following APIs:
- Hardware API
- IoT Main logic
- Publish and subscription API
Programming and Markup Languages utilized for Application development using the Meteor and bootstrap frameworks:
including exploring the HTTP protocols, especially in the context of using a REST-ful API.
Integration
Publishing data using Mosquito MQTT and also the Node-RED GUI utilizing:
- JSON objects
- Integrated Nodes
- Additional Nodes
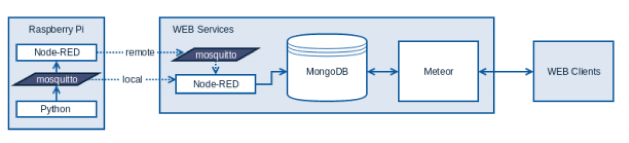
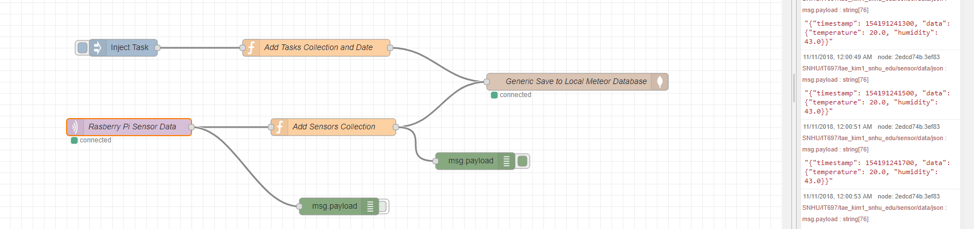
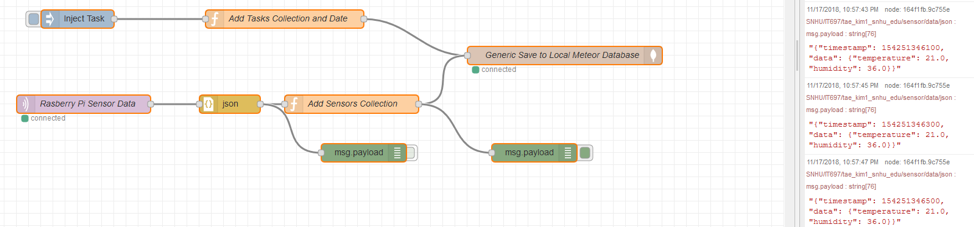
The following diagram illustrates major components and data flow of a potential application using such sensors:
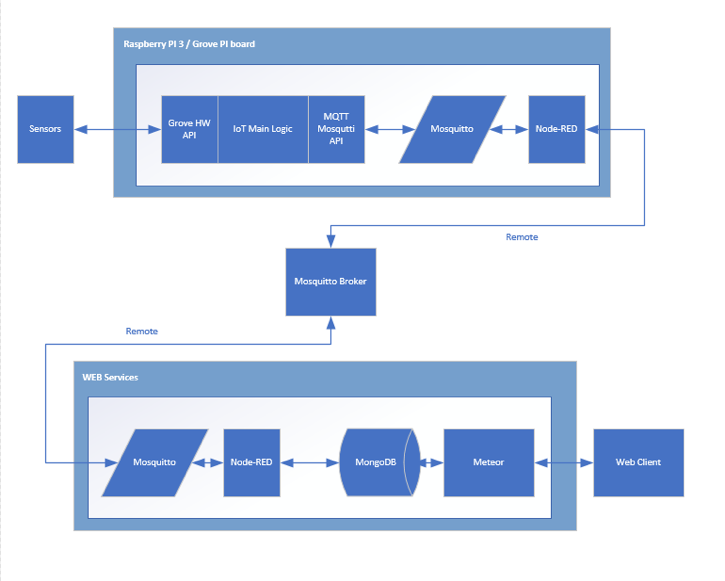
The Python code interacts with the sensors and will collect and publish the data using MQTT to a mosquito broker. Node-RED nodes will be used for integration flow and, on the receiving end,MongoDB and Meteor will be used to store and visualize the data, respectively. The main work will be with the temperature and humidity sensors but some of the additional sensors utilized can be sensors like:
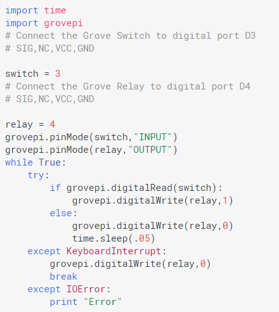
- Grove – Relay: digital on and off switch
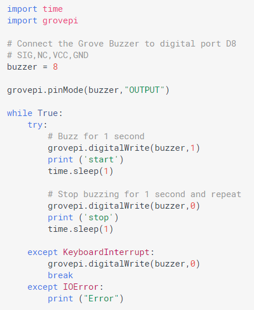
- Grove – Buzzer: Piezo buzzer to produce alarm when certain threshold condition triggers
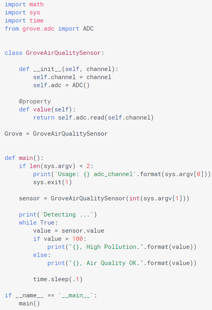
- Grove – Air Quality Sensor: Providing qualitive results over wide range of gasses with a scope of carbon monoxide alcohol, acetone, thinner, formaldehyde, etc.
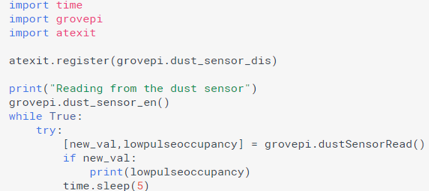
- Grove – Dust Sensor: provides air quality dust concentration measurements
- etc.
We can leverage tools such as Node-RED to build flows utilizing built-in nodes to save time by not having to code from scratch. We can use Meteor to build a real-time app utilizing its rich collection of libraries and packages and use MongoDB for data collection and storage. We mainly concentrate on development and architecture and allow for additional projects to explore security, robust application development, and code optimization. In particular, a lack of strong security is a serious threat in IoT and exploring top IoT security concerns, standards, and tools would be a great extension.
Sample code for these new sensors would be like so:
IoT devices help shape the connected world but, even as we enjoy the benefits offered by this new technology, security concerns abound, as well. Currently, the key focus of these IoT devices is on making like easer and simpler which, unfortunately, usually results in sacrificing security. As more devices come online and more sensitive data is passed on the wire, this will become an increasingly important problem. Embedding countermeasures and following best practices from the beginning is the key to counter this trend. As the IoT market starts to explode, we hear about more and more IoT breaches every day. Investing in security measures is no longer just a should and has instead become a must. Some of the security concerns listed on cso.com are:
|
Insecure web interface
|
Insecure Cloud Interface
|
|
Insufficient Authentication/Authorization
|
Insecure Mobile Interface
|
|
Insecure Network Services
|
Insufficient Security Configurability
|
|
Lack of Transport Encryption
|
Insecure Software/Firmware
|
|
Privacy Concerns
|
Poor Physical Security
|
Some of the countermeasures include:
|
Password hardening
|
Two factor authentications
|
|
Role base access control
|
Logging
|
|
Network ports hardening
|
Ability to securely update
|
|
Data encryption (Rest and transit)
|
Fuzz tested
|
|
De-identify data
|
Securing physical access 9USB, Storage media etc..)
|
Module By Module Overview of Activities
Module 1
For the first week, you have to setup the Raspberry Pi and GrovePi+:
-
First, you'll likely have to download the software to the SD card, so you can install the OS to the Raspberry Pi 3. You can get the software and installation guide from Raspberrypi.org, where you can also download NOOBS and RASPBIAN.
- You can optionally enable Wi-Fi on there
- Next, you'll have to install the Grove Pi software; you can use the software setup guide from dexterindustries.com and do the software update via something like:
sudo curl -kL dexterindustries.com/update_grovepi | bash
sudo reboot
- After rebooting, you can start working on the temperature & humidity sensor by following the instructions from the dexterindustries.com
- If you get -1 c and -1 % on the LCD screen, try placing the sensor on the different port D8 and change the code from 7 to 8 on this line, e.g.: dht_sensor_port = 7 # connect the DHT sensor to port 7
- If that doesn't work, you'll likely have to do a firmware update and reboot
- Next, you can run the Home_Weather_Display.py and see if you're getting correct readings for temperature and humidity, which you can convert from Celcius to Fahrenheit using F = C*9/5+32. You'll have to change the value that's printed within the loop at t=str(temp)
Module 2
The main goal for this module is to install MQTT on Raspberry Pi and send the sensor data from module one to http://test.mosquitto.org Some of the key activities will entail:
- Installing SSH and VNC on Raspberry Pi (ssh can be optional, I suppose)
- Installing the Mosquito message broker and testing messages (e.g., you might open two terminals and see if you can see a test "Hi there, I am the second terminal session" message on the second terminal)
- Install mosquitto server and start the local broker as a service or as a daemon: https://randomnerdtutorials.com/testing-mosquitto-broker-and-client-on-raspbbery-pi/ and https://theembeddedlab.com/tutorials/install-mosquitto-on-a-raspberry-pi/
- Start a command-line subscriber using
mosquitto_sub to the local broker
- Start a command-line publisher using
mosquitto_pub to the local broker
- Installing and testing the Paho Python client. This will involve creating a
mqtt_test.py file and testing to see if you get a message like "Hi there, I am a python MQTT client".
- Then, you can start the Python publisher and test with the command-line subscriber
- Publishing data from project one to the remote broker http://test.mosquitto.org and test it locally using something like this command-line subscriber
mosquitto_sub -h test.mosquitto.org -t "SCHOOL/COURSE/NAME/sensor/data/json" -v
- Publishing data that also has the Timestamp, Temperature, and Humidity
- Publishing data that is also in the JSON format.
- Publishing data to the topic SCHOOL/COURSE/NAME/sensor/data/json
- Subscribing to the published data and checking to see if the data is correct as well as checking for latency.
Module 3
Some of the key activities for week 3 are:
- Installing chromium-browser on the Raspberry Pi (optional)
- Installing Node-Red and required packages (dashboard package) on the Raspberry Pi
- Install and Update npm (install might be optional if it's already on there)
- Set Node-Red to auto start at every boot
- Check and test Node-Red by going to http://localhost:1880/
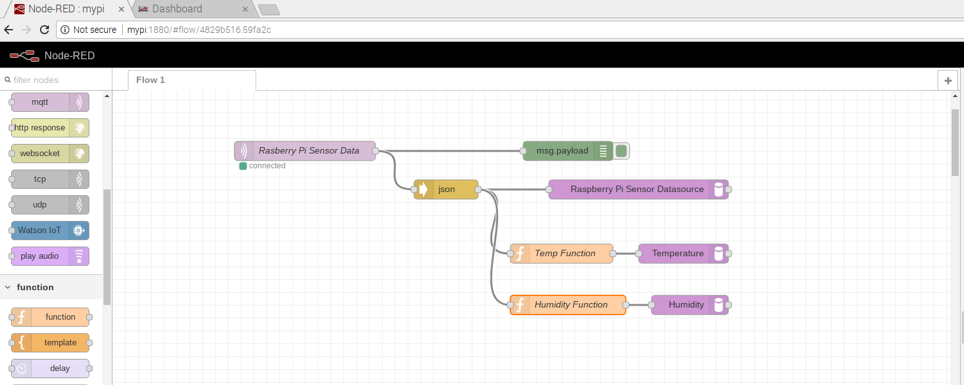
- Setup some nodes to read data from the MQTT broker as a subscriber and check values received via MQTT messages using a debugger node:

- Parse out the Temperature and Humidity values using custom JavaScript functions:

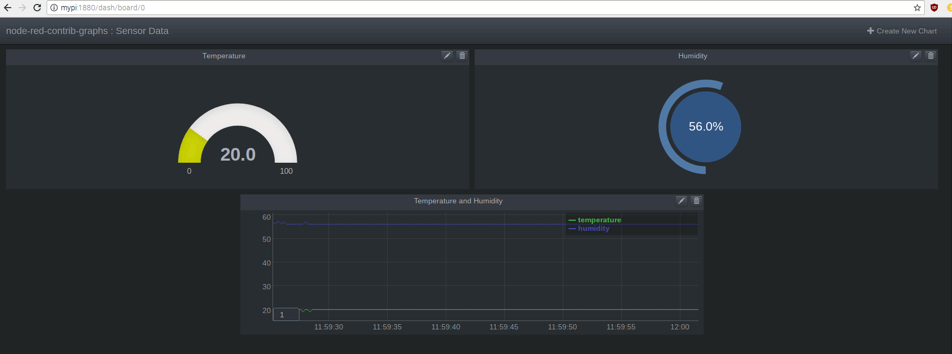
- Display the received and parsed Temperature and Humidity data in the dashboard:
Module 4
Some of the key activities for week 4 are:
- Install the Blue LED and the Potentiometer onto the Raspberry Pi
- Run the default led_fade.py program provided by GrovePI in the GrovePi/Projects folder to test the LED
- Move the potentiometer to see if the LED level changes
- Create a new program call led_fadeMQTT
- In this step, we'll modify the led_fade.py program to obtain the LED values from MQTT as a subscriber
(in Module 2, we similarly sent values to MQTT as a publisher in the mqtt_test.py or Home_Weather_DisplayMQTT.py program)
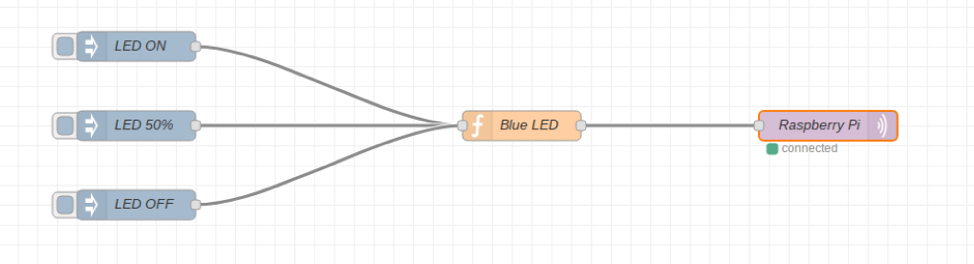
- Use Node-Red to create a new flow called Blue LED control with three inject nodes pre-configured for the values On (255), 50% (128), and Off (0)
-
Check and test the Blue LED flow by deploying it
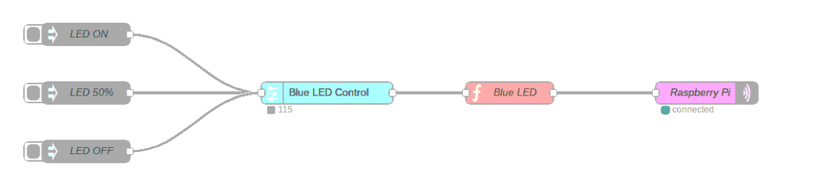
- The deployed node will publish to the MQTT broker the values that are injected into it (the values can be 0, 128, or 255)
-
Setup the UI in the Node-red flow by adding a Slider UI Node; we can then access the UI from http://localhost :1880/ui/#/0 and control
the LED on the Pi via either the Slider UI or the 3 Inject Nodes directly in Node-Red

-
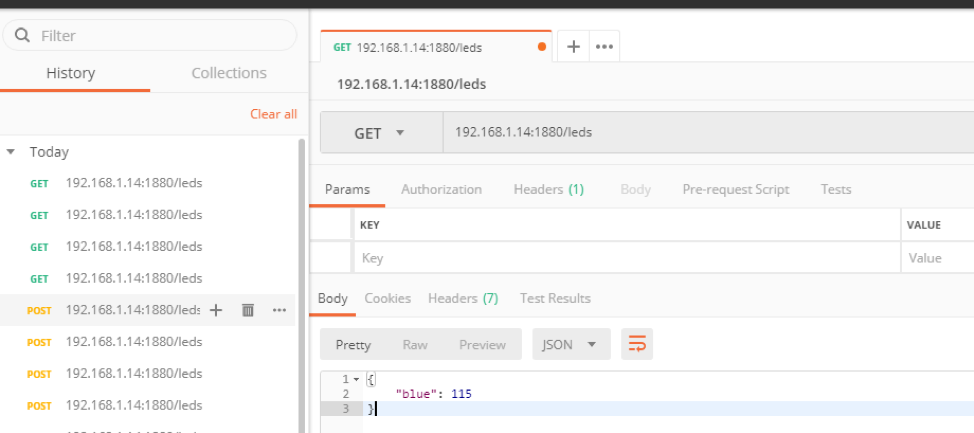
Add a POST Input HTTP node and a GET Input HTTP node to Set and Get the LED values respectively:

-
Test the POST and GET interfaces by sending data to them using Postman. Also check the data by using the Ui and see the value on Postman
Module 5
Some of the key activities for Week 5 where we will create a web application using Meteor are:
- Install Chocolatey, a Windows package manager, on a Windows PC (we need to install this application before we can install Meteor)
- Once Chocolatey is installed, we can install Meteor using the command
choco install meteor
-
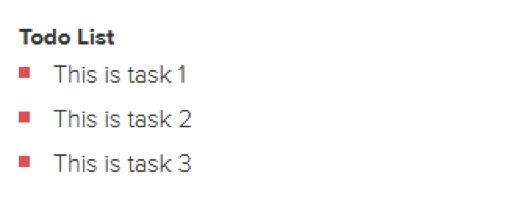
Now we can use Meteor to create a simple-todos app; let's first check the app by going to http://localhost:3000
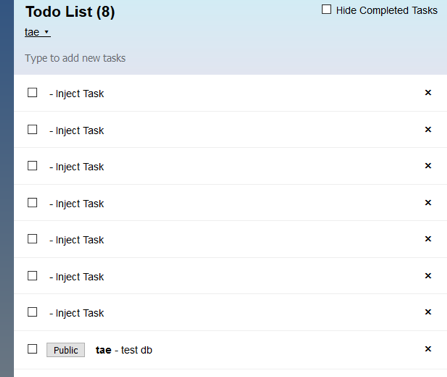
- Modify the HTML code to create the Todo List as seen below:
- Setup mongoDB for the collection
- Use the command
db.tasks.insert({ text: "Hello world!", createdAt: new Date() }); to check the mongoDB; this should add something like this: 
- Modify the code to show the task list
- Modify the code to add the delete function in the app
- Modify the code to see incomplete tasks
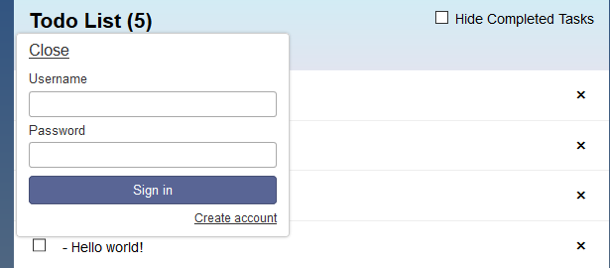
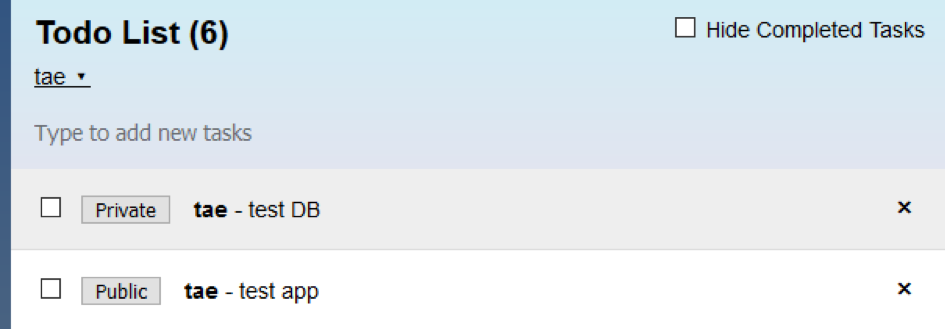
- Modify the code to create a user account as follows:
- Add publish and subscribe functions to the app:
Module 6
Some of the key activities for week six are learning how to connect Node-Red to MongoDB and send the data to test the mosquito website:
- Installing Node-Red and required packages (dashboard package) on the Windows PC
- Install and Update npm on the Windows PC
- On the Windows PC, set Node-Red to auto start at every boot and Check and test Node-Red by going to http://localhost:1880/
- Test Node-Red connection to MongoDB
- Debug display of MQTT messages on Node-Red
- Setup a local connection to the raspberry Pi
- Run the program from Lab two to check the data
- Check to see if we are getting in Node-Red from raspberry pi
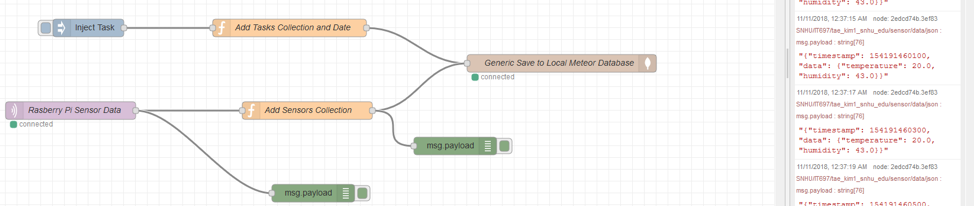
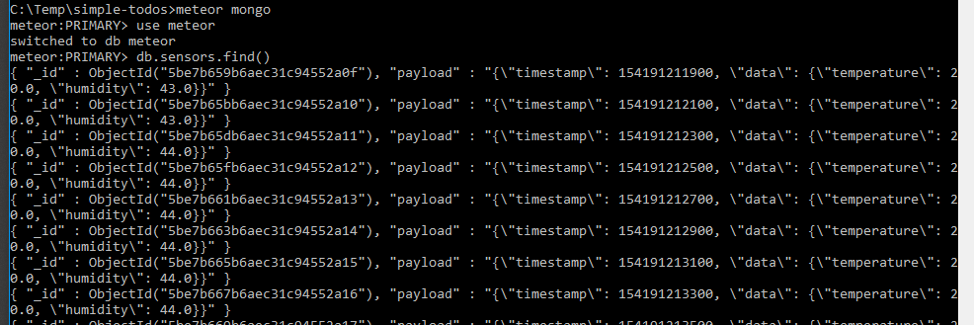
- Check meteor mongo for data
- Send data received from raspberry pi to test.mosquitto.org

- Install netifaces in Raspberry Pi
Module 7
In Week 7, we continue from Week 6 and will learn how to acquire sensor data from test.mosuitto.org using UUID and display the data to a new website we created using Meteor. Some of the key activities in week 7 are:
- Use Meteor to create a new IOT app
- Install bootstrap
- Remove insecure and autopublish
- Delete all of the project boilerplate files from the IOT folder
- Create dashboard.css in client folder
- Create html in client folder
- Create router.js in client folder
- Create main-layput.html in client folder
- Create topNav.html in client folder
- Create sideNav.html in client folder
- Create home.html in client folder
- Create dashboard.html in client folder
- Create sensor-table.html in client folder
- Create sensor-table.js in client folder
- Create collections.js in collections folder
- Create new flow in node-red
- Run new meteor software and check the webpage (http://localhost:3000/dashboard)


Module 8
This week we will focus on projects of interest so the weekly assignment is relatively light. This week's example demonstrates a generic IoT device architecture that supports dynamic reprogramming (at run time) using Node-RED. For example, we can setup a water detector where we'll use a water sensor for the raspberry pi (this is just a sample and you can pursue any variant you desire, of course!). The provided example features working with various GrovePi inputs and outputs, the creation of files using Python code, and Node-Red flows.
Some of the key activities for week eight will then be:
- Copy and clean the code samples from Module 8 example to be able to run the example as needed; this involves typing the code for ports.py, IoTDevice.py, and GroveDevices.py
- Note: the maximum value of the potentiometer is 1023 and the maximum value that can be recognized by the LED is 255
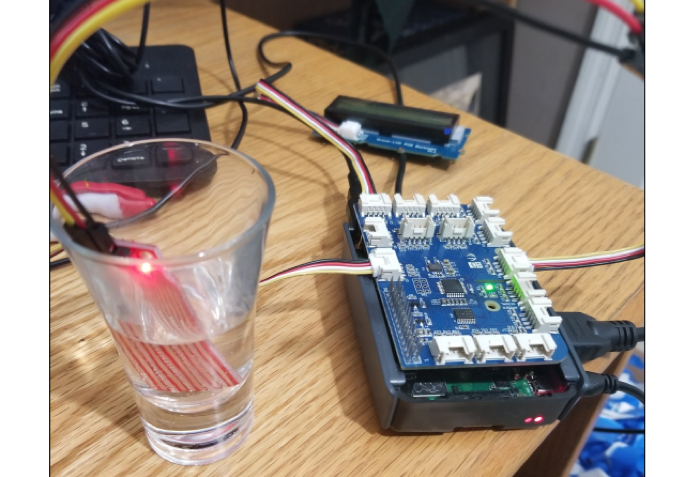
- Create new python file call water_sensor.py
- Install the water sensor to D2 on grovepi
- Power up the unit and test the water sensor
- Add example Node-RED and verify functionality
Once you get the interface face working, you can add things such as email alarms and a fancy web interface using Node-Red.
Please remember, this water sensor project is just a sample and you're
free to pursue your own completely different project this week!
Some Helpful Resources
Some Essential Tutorials
Learning Python Online
Here are some nice links for first learning Python:
What is a Full-Stack Developer
Full Stack Developer is familiar with all layers of software development:
- Front end is client-side (browser) and built with HTML, CSS, and JavaScript and often use a framework like Meteor.js, React, Angular, jQuery, etc.
- Back end is server-side and built using a framework or content management systems built upon programming languages like PHP, Ruby, Python, etc. and some Database System like SQL or MongoDB
- Full stack developers know both the front and back end and are familiar with various server, network, and hosting environments, APIs, and UI/UX
What is a REST-ful API
REST is less robust than Simple Object Access Protocol (SOAP) but uses less bandwidth, which is a benefit for web applications.
A RESTful API (REpresentational State Transfer) is an architecture that has the following properties and usually builds upon HTTP:
- Client-server:
- Stateless:
- Cacheable, Layered System:
- Code on demand:
- Uniform Interface: things are required to make it a REST API or RESTful interface:
- Servers offer access through resources, the things we utilize
- The things, or resources, have a representation with which clients can interact
- Each thing, or resource, is unique (identified by a URI in REST web APIs)
- The client and server exchange self-descriptive messages where each message includes information about how to process that message
- Each thing, or resource, is accessed via hyperlinks
Tips for Cracking Technical Interviews
SNHU Tips for Cracking the Technical Interview
Tips for Approaching Tough Programs
Our class can get quite frustrating, especially for students who don't have an extensive background in programming. The best approach to dealing with issues and errors in such cases is to start with very simple but fully functional code and then slowly adding changes to avoid an accumulation of errors.
The overall approach I might recommend is:
- List the functionality of what you want the code to do
- Outline, in pseudocode or a bulleted list format only, the structure of your solution
- Then, implement only the first one or two things and ensure it's functional and runs without errors after each small change
- This might involve starting with something as simple as a "Hello World!" program sometimes
- Make that simple program and run it to ensure its error free
- Then add changes one or two lines (or, at most, one or two logical components) at a time and run it after each to ensure it's still error-free
If you still run into issues, the next step would be to search for the specific error online to see if there are helpful posts on stackoverflow or other such sites on the Web. If that fails, as well, you can post in the discussion forums online with the following:
- List what you're trying to do
- Post the specific code and also what you expected it to do
- This is where you might want to highlight the portion of the code you think is causing issues
- Give the full error stacktrace and also your guess on what might be going wrong
Tips for Seeking Help: The First Step
Step 1: If you run into any problems at all, please start by searching for that issue on Google! You might be amazed at how almost all of the problems you come across were already asked and resolved on the web.
And, failing that, please post in our class forums. When you do post, please do feel free to include screenshots from the raspberry pi to help give details of the issue. Almost all of these hints are garnered from a combination of online forums, class forums, and voodoo programming. :)